How to Fix Glasses An At-Home Repair Guide
It’s incredibly frustrating when your glasses get bent out of shape or a screw comes loose. But before you book an appointment with your optician, you should know that you can fix many of these common issues right at home. A wobbly arm or slightly crooked frames are often simple to tackle with just a few basic tools and a little patience.
You don't need to be an expert to get your glasses back into comfortable, wearable shape. Most everyday mishaps, like your glasses constantly sliding down your nose or sitting askew after an accidental drop, are surprisingly manageable.
This guide is your first-aid station for eyewear emergencies. We'll walk you through diagnosing the most common (and annoying) problems and give you the confidence to handle them yourself. Think of it as empowering you to restore your own vision, without the wait or the extra cost.
Critical Dos and Don'ts for DIY Repairs
Before you jump in, let's cover a few ground rules. The goal is to fix the problem, not create a bigger one. I've seen simple repairs turn into disasters because someone got impatient or used the wrong tool.
- DO use the right tools for the job. An eyeglass repair kit with a proper tiny screwdriver is a must. If you need to bend metal frames, use pliers with padded or taped tips to prevent scratching the finish.
- DON'T even think about using super glue. It's the enemy of eyewear. It becomes brittle, can ruin your frame's coating, and makes it nearly impossible for a professional to do a proper repair later on.
- DO work on a soft, clean surface. Lay down a microfiber cloth or a soft towel. This simple step will save your lenses from getting scratched while you’re focused on the frames.
- DON'T apply a lot of force. Gentle, slow adjustments are always the way to go. Metal can get fatigued and plastic can snap if you try to bend it too much, too fast.
The real secret to a successful home repair is patience. Rushing the process or grabbing the nearest pair of kitchen pliers is the quickest route to turning a small fix into a permanent break. Start with tiny adjustments and check the fit as you go.
To make things even clearer, I've put together a quick reference guide for the most common issues you'll likely face.
Quick Fix Reference Guide
Use this table to quickly identify your problem and the recommended home-repair solution.
| Common Problem | Essential Tools | Quick Fix Action |
|---|---|---|
| Wobbly or loose arm | Eyeglass screwdriver | Gently tighten the small hinge screw until the arm feels secure but still moves freely. |
| Crooked or bent frames | Padded pliers (for metal) or warm water (for plastic) | Make small, careful adjustments to the bridge or temple arms until they sit evenly. |
| Glasses slide down nose | Padded pliers, screwdriver | Adjust the nose pads inward for a tighter fit or tighten the temple screws. |
With this table, you can pinpoint the issue and see exactly what you need to do. It’s all about having the right information and taking your time.
Assembling Your Eyeglass Repair Kit
Any successful glasses repair starts with having the right tools ready to go. The good news? You don't need a professional-grade workshop. A simple, well-chosen kit is all it takes to handle most of the common issues life throws at your specs. Being prepared lets you fix a problem right away, without that last-minute panic.
A few key items will get you through almost any quick fix. Consider these the absolute essentials for your at-home repair station.
Your Core Repair Tools
The heart of any kit is an eyeglass screwdriver set. These are made specifically for the tiny, delicate screws in your frames' hinges and nose pads. Trying to use a standard household screwdriver is a recipe for disaster—it's way too big and will almost certainly strip the screw head, turning a five-minute fix into a real headache.
Next, you'll need something to grip the frames firmly but gently. I learned the hard way that regular pliers from the garage will instantly scratch and ruin a frame's finish. Instead, get yourself a pair of jewelry or plastic-tipped pliers. Their soft, padded tips give you the leverage you need to bend metal frames back into shape without leaving a single mark.
Finally, always have a clean, lint-free microfiber cloth on hand. This is your multi-purpose tool: it protects your lenses from getting scratched while you're working and is perfect for wiping away smudges when you're done.
Here's a pro-tip from my own experience: I always put a small piece of low-tack painter's tape over the lenses before making any adjustments. It adds an extra layer of scratch protection and peels right off without leaving any sticky stuff behind.
Clever Household Substitutes
While a proper kit is ideal, a few common household items can save the day in a pinch. If you're having trouble seeing those minuscule screws, a magnifying glass can be a game-changer. Don't have one lying around? The magnifier app on your smartphone works surprisingly well.
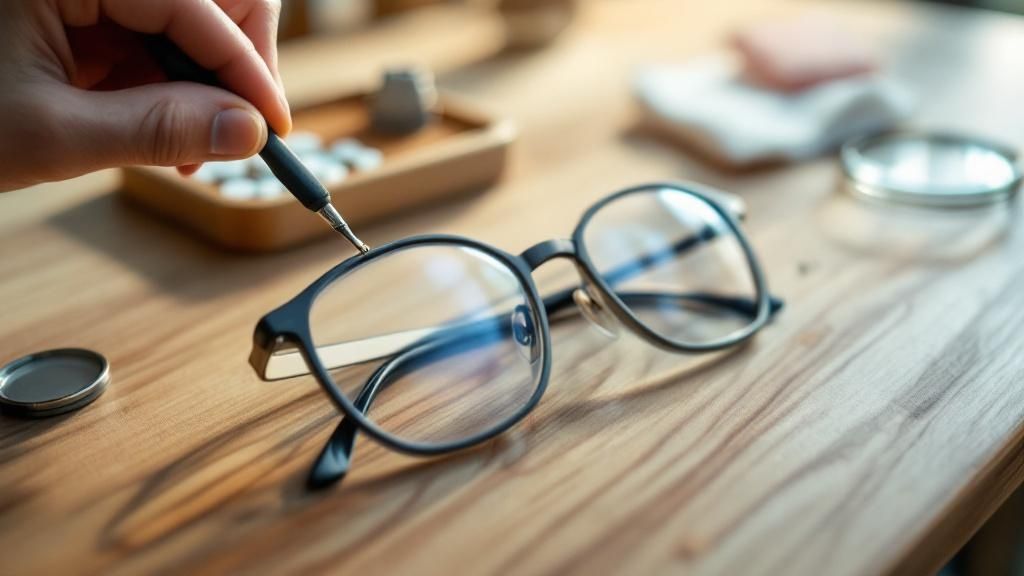
Fixing Loose Screws and Wobbly Arms
There are few things more annoying than a wobbly arm on your favorite pair of glasses. It’s not just the constant sliding down your nose that gets frustrating; a loose arm throws off the alignment of your lenses, forcing you to constantly readjust. Over time, that subtle misalignment can lead to some serious eye strain. If you spend a lot of time on screens, this problem only gets worse. You can learn more about how to reduce eye strain from computer use in our guide.
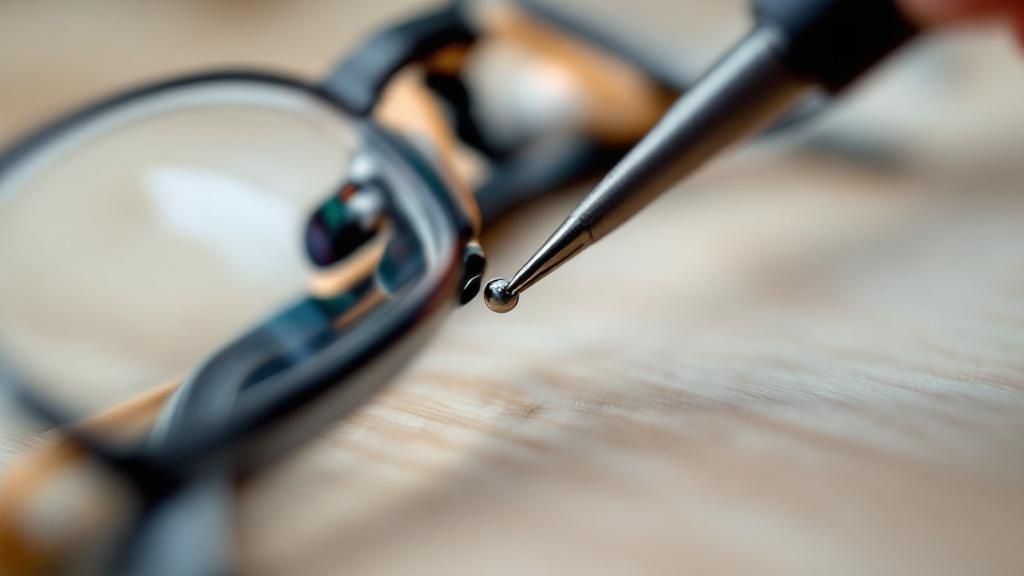
Thankfully, the fix is usually pretty simple: tightening that tiny hinge screw. But doing it right is the key to avoiding a bigger headache, like a scratched lens or a stripped screw. My go-to technique is to first fold the glasses and lay them upside down on a soft microfiber cloth. This creates a stable base to work from.
Next, I hold the frame firmly right next to the hinge with one hand. This is crucial. It prevents the frame from twisting and stops the tiny screwdriver from slipping and gouging a lens. With my other hand, I gently turn the screwdriver.
Securing the Fit
When tightening that screw, your goal is "snug," not "stuck." Turn it slowly just until you feel a bit of resistance. The arm should still fold open and closed smoothly, but all the wobble should be gone. If you crank down on it too hard, you risk stripping the delicate threads inside the hinge, which makes a future repair nearly impossible without a trip to the optician.
But what if the screw is gone completely? Most decent eyewear repair kits come with a few replacements. If you're in a pinch and don't have one, I've seen a toothpick tip, broken off carefully inside the screw hole, work as a temporary hold until you can find a proper replacement screw.
Here's a personal tip that has saved me countless trips to the glasses shop. After you've tightened the screw, take some clear nail polish and apply a tiny, precise dab right over the screw head. It acts like a homemade thread-locker and will keep that screw from wiggling loose for months.
This image shows how a few careful adjustments can completely restore your glasses' fit and function. It's all about gentle technique, not brute force.

With the global eyewear market projected to hit US$151.37 billion by 2025, knowing how to do these small repairs yourself is a valuable skill. It's also interesting to note that 64% of eyewear users are women, a statistic that definitely influences the design and common repair needs of modern frames.
Straightening Bent Metal and Plastic Frames

It’s a classic, gut-wrenching moment—you hear a crunch and realize you’ve just sat on your glasses. But a bent frame is more than just an aesthetic issue. It completely throws off the alignment of your lenses, which can mess with your vision and even trigger headaches or eye strain.
Don't panic just yet. In many cases, you can coax those frames back into shape yourself. The trick is knowing how to handle your specific frame material, because metal and plastic need completely different approaches.
Adjusting Metal Frames
For metal frames, your best tools are a pair of padded or plastic-tipped pliers and a whole lot of patience. Whatever you do, don't use bare metal pliers; they'll chew up the finish on your frames in a heartbeat. If you don't have proper jewelry pliers handy, you can wrap the tips of a standard pair with a few layers of tape. It's a decent workaround.
Before you start bending, lay a soft microfiber cloth over the lenses to keep them safe from scratches. Now, take a good look and figure out exactly where the bend is. Is it the bridge over your nose, one of the arms, or a temple tip?
- For a crooked bridge: Gently grab the bridge with your padded pliers. Apply tiny, gradual bits of pressure to bend it back. Keep setting the glasses down on a flat table to check if they're level.
- For a bent arm (temple): Secure the frame at the hinge with one hand. With your other hand, use the pliers to carefully guide the arm back into its original position.
The absolute golden rule here is to go slow. Making a series of small, careful adjustments is always better than trying to fix it with one big, forceful bend that could snap the metal.
Reshaping Plastic Frames
Plastic frames require a bit more finesse—you need to use controlled heat. The goal is to make the plastic just soft enough to be reshaped without melting the frame or, worse, destroying your lens coatings.
Your safest bet is to use warm running water from your tap. Hold the bent part of the frame under the stream for about 30 to 60 seconds.
Critical Tip: The water needs to be warm, not hot. If it’s too hot to comfortably keep your hands in, it’s way too hot for your glasses. Extreme heat can make expensive lens coatings bubble or peel right off, and that damage is permanent.
Once the plastic feels pliable, use your thumbs to apply slow and steady pressure, gently bending the frame back toward its proper shape. Put them on and see how they feel. If they’re still a bit off, just repeat the warming process. A little patience here can save you from snapping a frame in two.
How to Replace and Adjust Nose Pads
Nose pads are the unsung heroes of eyeglass comfort. They take a lot of abuse, and over time they can get grimy, hard, or even break off entirely. The good news is that replacing them is one of the easiest at-home fixes you can do, and it can make a pair of worn-out glasses feel brand new.
First things first, you need to figure out what kind of nose pads you're working with. Most glasses use one of two main types: screw-in or snap-on (sometimes called push-in). A quick inspection is all you need. If you spot a tiny screw, you've got screw-in pads. No screw? Then you're dealing with the snap-on variety.
Replacing and Fine-Tuning Your Pads
For screw-in pads, grab your eyeglass screwdriver. Just unscrew the old pad, pop the new one into position, and tighten the new screw until it’s snug. Don't overtighten it, just make it secure.
For snap-on pads, you can usually use a fingernail or a small, flat tool to gently pop the old pad out of its metal housing. Then, just line up the new pad and press it firmly until you feel or hear it click into place.
Once the new pads are on, you can perfect the fit by adjusting the pad arms—those little metal posts holding the pads. This is where you can solve that annoying problem of your glasses constantly sliding down your face.
- If your glasses slide down: Use your thumbs to gently push the nose pads a little closer together. This creates a tighter grip on your nose.
- If your glasses pinch or sit too high: Carefully use your thumbs to push the pads slightly farther apart. This will relieve the pressure and let them sit more comfortably.
Take your time here. Make tiny, gradual adjustments. A proper fit isn't just about comfort; it ensures your lenses are correctly aligned with your eyes for the best possible vision.
Getting into the habit of replacing worn-out nose pads is a small but crucial part of good eyewear care. For more simple maintenance tips to keep your frames in top shape, check out our guide on how to take care of your eyeglasses.
Of course. Here is the rewritten section, crafted to sound like it was written by an experienced human expert, following all your specified requirements.
When You Should See a Professional Optician
Knowing how to handle minor glasses repairs yourself is incredibly useful, but the real wisdom lies in knowing your limits. I’ve seen it happen too many times: a well-meaning DIY fix turns a small problem into an expensive, irreversible disaster. The last thing you want is to cause damage so severe that even a professional can't save your favorite frames.
My personal rule of thumb is pretty straightforward. If the problem involves a clean break anywhere on the frame, damage to a special coating, or the lenses themselves, it’s time to step away and call in a pro. Trying to superglue a snapped frame or buff out a deep scratch almost never works out and usually just prevents a proper repair from being possible later on.
Clear Signs to Visit an Optician
Some issues are just beyond the scope of a home toolkit. These are the big red flags that mean you should be booking an appointment with your optician, not heading to the hardware store.
- A Frame Snapped in Two: If your frame has a clean break—especially at a complex spot like the bridge or hinge—it needs more than glue. Professionals use specialized tools like soldering equipment to securely weld the pieces back together, something you just can't replicate at home.
- Deep Scratches on Lenses: Let’s be clear: there is no safe or effective way to remove deep scratches from your lenses at home. Those internet "hacks" almost always end up stripping the delicate anti-reflective or UV coatings, ruining your vision and wasting your money.
- Damage to Lens Coatings: See any peeling, bubbling, or flaking on your lenses? That’s a job for an expert. Only an optician can properly assess the damage and determine if the lenses need to be replaced.
- High-End or Complex Frames: Did you invest in a pair of pricey designer frames or ones made from specialty materials like titanium or horn? Don't risk it. A professional will have the specific knowledge and tools required to handle these materials without causing damage.
Handing over a complex job to a professional is always the smartest play. You also have to consider the age and value of your glasses. If they're an older pair and the repair is major, it might honestly be more cost-effective to start looking for a new pair.
With the global eyewear market projected to hit an incredible US$177.4 billion by 2031, access to professional repair services is better than ever. The key is knowing when to use them. You can learn more about these market trends on MarketResearch.com.
Common Questions About At-Home Glasses Repair
Diving into a DIY glasses fix can feel a little daunting. I get it. Over the years, I've heard just about every question in the book, so let's tackle a few of the most common ones that come up.
Can I Just Use Super Glue to Fix My Glasses?
It’s tempting, I know, especially when you need a quick fix. But please, step away from the super glue. It's one of the most common mistakes people make, and it can be a costly one.
Super glue becomes very brittle when it dries, meaning it will just snap again under the slightest pressure. Even worse, the harsh chemicals can eat away at your frame's finish and destroy any protective coatings on your lenses. If you bring super-glued frames to an optician, they often can't do a thing—the glue makes a professional repair next to impossible.
How Can I Get Scratches Out of My Lenses at Home?
This is another one I hear all the time. The short, honest answer is: you can't.
There are tons of "life hacks" online that suggest using things like toothpaste or baking soda. All these methods do is strip away the essential anti-reflective and UV-protective coatings on your lenses, which ultimately makes your vision even worse. While there are some 10 amazing facts about glasses, unfortunately, magical scratch removal isn't one of them.
If you're dealing with deep or distracting scuffs, the only real solution is to have an optician replace the lenses.
At Spektrum Glasses, we want to give you the confidence to properly care for your eyewear for the long haul. Our frames, from blue light blocking glasses that guard your eyes during screen time to high-performance driving glasses that sharpen your view, are designed for real life. Check out the full collection at https://www.spektrumglasses.com.